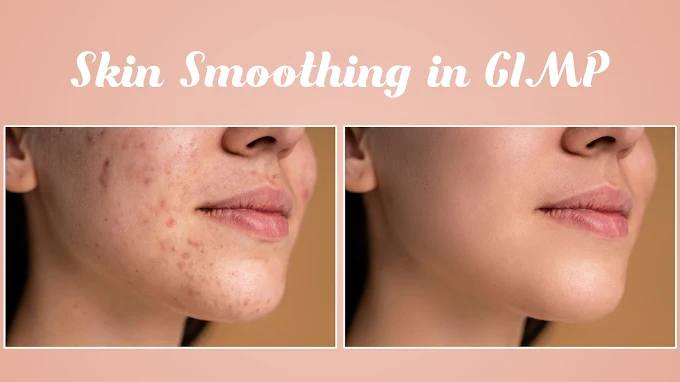
A Step-by-Step Guide to Skin Smoothing in GIMP
In this tutorial, we will walk you through the process of performing skin smoothing in GIMP, an open-source image editing software. We'll cover everything from preparing the image to applying various tools and filters to achieve a smooth, natural-looking skin texture. Let's get started!
Step 1: Preparing the Image
To begin, you should have your image loaded in GIMP. For this tutorial, we'll work with a duplicate layer of the original image. This allows you to keep the base image intact for comparison.
Duplicate the Layer: Start by duplicating the image layer. You can do this by right-clicking on the layer in the Layers panel and selecting "Duplicate Layer." This duplicate layer will serve as your working canvas.
Initial Cleanup with the Heal Tool: Before applying any smoothing techniques, it's essential to clean up any noticeable blemishes or imperfections. For this, we'll use the Heal tool.
- Select the Heal Tool from the toolbox.
- Adjust the size and hardness of the brush as needed.
- Hold down the Ctrl key and click to sample a clean area close to the blemish.
- Then, paint over the blemish to blend it with the surrounding skin.
This step ensures that your final smoothing effect will look more natural.
Step 2: Applying Skin Smoothing
Now that the initial cleanup is done, we can move on to the main skin smoothing process.
Duplicate the Cleaned Layer: After using the Heal tool, duplicate this cleaned layer. This will allow you to compare the results and make adjustments as needed.
Invert Colors: To enhance the smoothing effect, we’ll invert the colors of the duplicated layer.
- Go to the top menu and select Colors > Invert.
Change Layer Mode: After inverting the colors, change the layer mode to Vivid Light. This step will prepare the image for the high pass filter application.
Step 3: Using the High Pass Filter
The High Pass filter is useful for retaining texture while smoothing the skin. Here’s how to apply it:
Apply High Pass Filter:
- Go to Filters > Enhance > High Pass.
- Adjust the filter settings to balance between smoothing and retaining some skin texture.
Blur the Layer: After applying the High Pass filter, you need to blur the layer to soften the skin further.
- Go to Filters > Blur > Gaussian Blur.
- Adjust the blur radius until you achieve a smooth but textured skin appearance.
- Click OK to apply the blur.
Step 4: Refining the Smoothing Effect
To ensure that the smoothing effect only applies to the skin and not other parts of the image, we'll use a layer mask.
Add a Layer Mask:
- Right-click on the top layer and select Add Layer Mask.
- Choose Black (full transparency) as the mask type and click Add.
Paint on the Layer Mask:
- Select the Brush Tool and set the foreground color to white.
- Carefully paint over the skin areas where you want to apply the smoothing effect. Avoid painting over features like the eyes, mouth, or nose to keep their natural texture.
Adjust the Brush Settings:
- You can adjust the size and hardness of the brush to refine the effect, especially around edges or delicate areas.
Step 5: Final Touches
Once you're satisfied with the smoothing effect, you can create a new layer from the visible layers to finalize the image.
Create a New Layer from Visible: Right-click on any layer and select New from Visible. This will merge your work into a single layer while preserving the original layers below.
Compare Before and After: Toggle the visibility of your original layer to compare the before and after results. You should notice a smoother, more refined skin texture while maintaining some natural details.
Watch the Tutorial
For a more detailed walkthrough, check out our YouTube video below. This video provides a visual guide to creating the grunge text effect in GIMP.
Conclusion
And there you have it! By following these steps, you’ve successfully applied a professional skin smoothing effect using GIMP. This method allows you to enhance portraits and other images while retaining a natural look. Feel free to experiment with different settings and adjustments to achieve the desired outcome.
Thanks for following along with this tutorial! If you found it helpful, don't forget to share it with others and explore more GIMP tips and tricks. Happy editing!
Image Link : Click Me
Download GIMP: Click Me
Feel free to ask any questions or leave a comment below. Happy designing!


